Schema markup is a term that sounds much more complicated than it actually is. Before you start Googling, “structured data vs schema markup,” “what is rich snippets,” or “schema for beginners,” sit tight and get ready to learn because this is your definitive guide to Google schema markup and everything you need to know about it.
Schema Markup: What You Need to Know
Words are usually less intimidating once you know what they mean, so let’s begin with two definitions from very reputable sources:
- Structured data, also called schema markup, is a type of code that makes it easier for search engines to crawl, organize, and display your content.
- Structured data markup is a text-based organization of data that is included in a file and served from the web… refers to kinds of data with a high level of organization, such as information in a relational database.
What we get from these two definitions is that schema markup, AKA structured data, greatly helps with your website’s organization. And as we know, the more organized, structured, and predictable data is, the more that search engine crawlers will like it (we’ll get into this shortly).
Think of structured data as an interpreter that tells search engines what your data means. We, as humans, understand what’s on a website with relative ease. When we see a series of numbers in (xxx) xxx-xxx format, we know that it’s a phone number. When we see:
- 2 ¼ cups all-purpose flour
- 1 cup butter, softened
- 3/4 cup granulated sugar
- 3/4 cup packed brown sugar
- 2 large eggs
- 2 cups semi-sweet chocolate chips
- 1 cup chopped nuts
We know that it’s a recipe for (delicious) cookies. Without helpful markup aiding them, search engines will only know what is being said, not what is meant.
Not as vital but still important to know, there are three structured data types that you can use: JSON-LD, Microdata and RDFa. Structured data is usually represented in JSON-LD (JavaScript Object Notation for Linked Data) because it’s what Google prefers (and you definitely want to appease Google).

For instance, here is a Google provided JSON-LD structured data markup example for a company’s contact information (because Google structured data examples are the best):
<script type="application/ld+json">

{

"@context": "http://schema.org",

"@type": "Organization",

"url": "http://www.your-company-site.com",

"contactPoint": [{

"@type": "ContactPoint",

"telephone": "+1-401-555-1212",

"contactType": "customer service"

}]

}

</script>
Now it’s time to discuss why you need structured data.
Structured Data SEO Benefits
Want to increase your search engine rankings? Structure your data.
Look at it this way, the more structured your data, the easier it will be for search engines to crawl your website. And the easier it is to crawl your website, the more SEO advantages you’ll receive.
Additionally, schema markup allows your content to appear in two categories of Google search features:
Rich Results
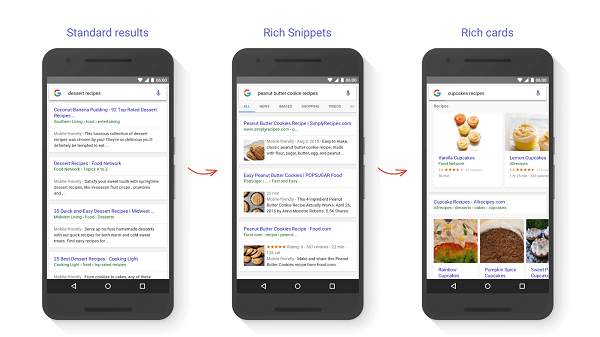
Structured data for content like ratings and recipes appears in Rich Cards. For those who don’t know, rich cards appear in organic search results as a single element or a list of elements. They’re also much more engaging than traditional results, as they have more structure and contain a visual preview of what your markup is describing.
So if you have a recipe, the host site, a picture of the recipe, a snippet of information, etc. will appear on the recipe card. And when you use AMP pages (very important in today’s mobile-focused world), your content becomes eligible for additional features.
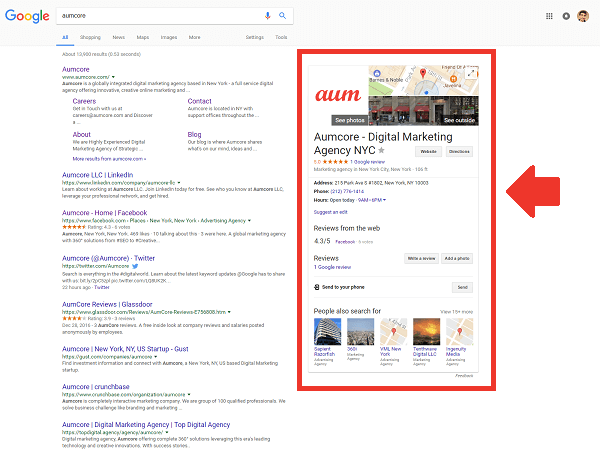
Knowledge Graph Cards
Google treats your site’s content as factual if you’re an authority figure for certain content. As such, your content appears as a Knowledge Graph that is prominently displayed on Google searches. A quick FYI, these cards are included in Google’s system for organizing information about millions of well-known entities, like people, places and organizations.
So You Want to Add Structured Data to Your Site
If you want an easy, step-by-step guide to schema markup, good, because you’ve come to the right place. Before you get to the actual implementation, make sure you’re following Google’s Technical Guidelines:
- Publish markup on your official website
- Use the most specific applicable type and and property names defined by schema.org (schema.org is a collaborative community founded by Google, Microsoft, Yahoo and Yandex, that strives to promote schemas for structured Internet)
- Mark up all relevant pages
- Mark up pages must not be blocked to Googlebot
Got it? Good. Time to get down to business.
Your Handy Structured Data Markup Helper
Here’s where you’ll actually be creating the schema markup, so pay attention and follow every step:
- Visit Google’s Structured Data Markup Helper page and use their schema markup generator (isn’t Google wonderful?).

- Select what you want to mark up (website or email) and click on a data type (articles, movies, events, etc.).
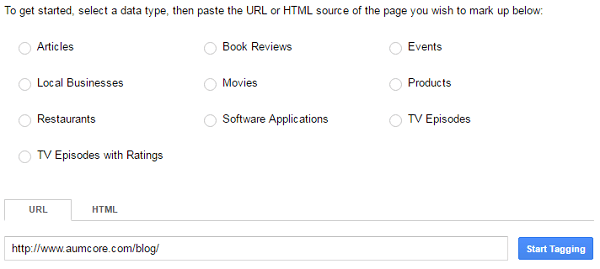
- Paste the website URL or HTML source code you want to mark up and click on, “Start Tagging”.

- If you’ve been following along, you should arrive at a page with two sections: the page’s content or HTML code on the left and the schema markup tool on the right.
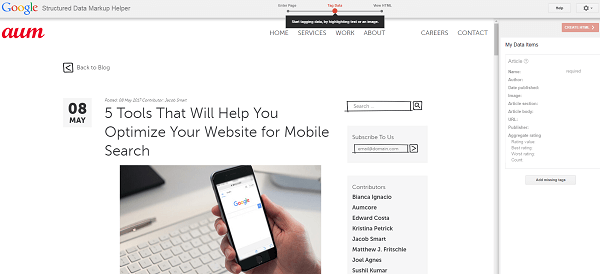
- When you highlight what you want to mark up on the left, a box with markup tagging options (Name, Author, Image, Date Published, etc.) will pop up. Click on what you’re marking up and continue.

- The change will be reflected on the right section under “My Data Items” —> Here, you’ll also find the main elements Google recommends to mark up.
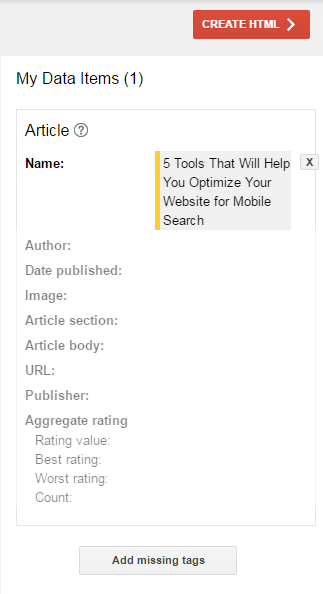
- Once you finish tagging everything you want to mark up, click on “Create HTML” in the upper right-hand corner.
- Next comes the formatting option. Because we’re dealing with Google, click on JSON-LD because it’s what they prefer.
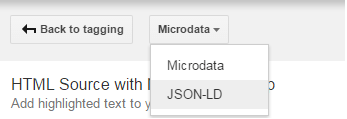
- Copy the generated code and…
- If you have a static-only website, click on the “Download” button, go into the page’s source code, delete the current code and paste the new one.
- If you have a nonstatic website, things are much more difficult, so it’s recommended to contact your friendly neighborhood web developer for help.

While not a required step, copy and paste the HTML source code into Google’s testing tool to make sure that the markup can be properly processed. If you want to see the tool in action before submitting you own information, copy and paste the following code and see what you get:
<!doctype html>

<html amp lang="en">

<head>

<meta charset="utf-8">

<title>Perfect Apple Pie Recipe</title>

<link rel="canonical" href="http://example.ampproject.org/recipe-metadata.html" />

<meta name="viewport" content="width=device-width,minimum-scale=1,initial-scale=1">

<script type="application/ld+json">

{

"@context": "http://schema.org/",

"@type": "Recipe",

"name": "Perfect Apple Pie",

"author": "Gin Blanco",

"image": "http://images.edge-generalmills.com/56459281-6fe6-4d9d-984f-385c9488d824.jpg",

"description": "A classic apple pie takes a shortcut with easy Pillsbury® unroll-fill refrigerated pie crust.",

"aggregateRating": {

"@type": "AggregateRating",

"ratingValue": "4.5",

"reviewCount": "276",

"bestRating": "5",

"worstRating": "1"

},

"prepTime": "PT30M",

"totalTime": "PT3H",

"recipeYield": "8",

"nutrition": {

"@type": "NutritionInformation",

"servingSize": "1 medium slice",

"calories": "230 calories",

"fatContent": "1 g",

"carbohydrateContent": "43 g",

"cholesterolContent": "0 mg",

"fiberContent": "1 g",

"proteinContent": "1 g",

"saturatedFatContent": "2 ½ g",

"servingSize": "1 Serving",

"sodiumContent": "200 mg",

"sugarContent": "27 g",

"transFatContent": "0 g"

},

"recipeIngredient": [

"1 box Pillsbury™ refrigerated pie crusts, softened as directed on box",

"6 cups thinly sliced, peeled apples (6 medium)",

"3/4 cup sugar",

"2 tablespoons all-purpose flour",

"3/4 teaspoon ground cinnamon",

"1/4 teaspoon salt",

"1/8 teaspoon ground nutmeg",

"1 tablespoon lemon juice"

],

"recipeInstructions": [

"1 Heat oven to 425°F. Place 1 pie crust in ungreased 9-inch glass pie plate. Press firmly against side and bottom.",

"2 In large bowl, gently mix filling ingredients; spoon into crust-lined pie plate. Top with second crust. Wrap excess top crust under bottom crust edge, pressing edges together to seal; flute. Cut slits or shapes in several places in top crust.",

"3 Bake 40 to 45 minutes or until apples are tender and crust is golden brown. Cover edge of crust with 2- to 3-inch wide strips of foil after first 15 to 20 minutes of baking to prevent excessive browning. Cool on cooling rack at least 2 hours before serving."

]

}

</script>

<style>body {opacity: 0}</style><noscript><style>body {opacity: 1}</style></noscript>

<script async src="https://cdn.ampproject.org/v0.js"></script>

</head>

<body>

<h1>The best apple pie recipe you’ll ever try!</h1>

</body>

</html>
And… done!
See? Not as hard as you thought it would be. So sit down, get your bearings, and go ahead and structure your data.


Tell us your thoughts in the comments